Pages

Monday 29 July 2013

Primark Mini Haul!

Hello my lovelies!

Wow, it's been quite a while since I wrote on here last! Mainly because I have had blog writer's block and have had absolutely nothing to write about and the fact that I have been quite busy and my camera ran out of battery and I lost the charger. Sorry for that quick 'life update'. 

Anyway, recently I have become a little bit addicted to Primark, which is a good thing for my purse as their stuff is cheap and cheerful but also, the quality of their items has improved! So, this is a collection of things that I have bought recently for me to show you as Primark doesn't have an online shop so you never know what is in there. Also, I know I like to be nosey and see what other people have bought in Primark, so I guessed that my readers would too. 

Let's crack on!

Maxi Skirt with Slit: £8

Firstly, I bought a maxi skirt! Now, I'm not one for flowing dresses or long maxi skirts but this one just caught my eye because it has a slit in it down the front! I've got to admit, the slit does come up a bit high but that's something that we can all work with. Also, it does give you an opportunity to do an 'Angelina Jolie', meaning that you stick your leg out of your skirt/dress and consequently, get your own twitter account made about it. Anyway, I thought that the material was pretty decent, and it looks very pretty and it is an evening essential if you're going away somewhere or a night out! You could team this with crop tops, vest tops, any top you liked really! 

Collared Shirt: £8
The second item that I bought will be no surprise to any of you, but I bought a collared shirt with little rolled up sleeves which I think is super cute. It does come in a range of colours and I do aim to buy all of them because I am that sad, but I chose yellow because it's a bright summery colour and it looks very pretty. The material is of a good quality, except it's see-through so you will need to wear a cami underneath to protect your modesty.

T-Shirt Dress: £5
Moving on to dresses! Now, this dress is an absolute bargain at the small, minuscule price of £5. This is perfect for those of you that need a day dress for a cheap price and they do these in a range of colours too, for £5 and some without the polka dots. Again, it's a tad see through but we can work around it! This dress is also really, really flattering. It starts to clinch to the body at around the bottom of your ribcage so it's really flattering and makes you look very, very skinny which is an added bonus. 

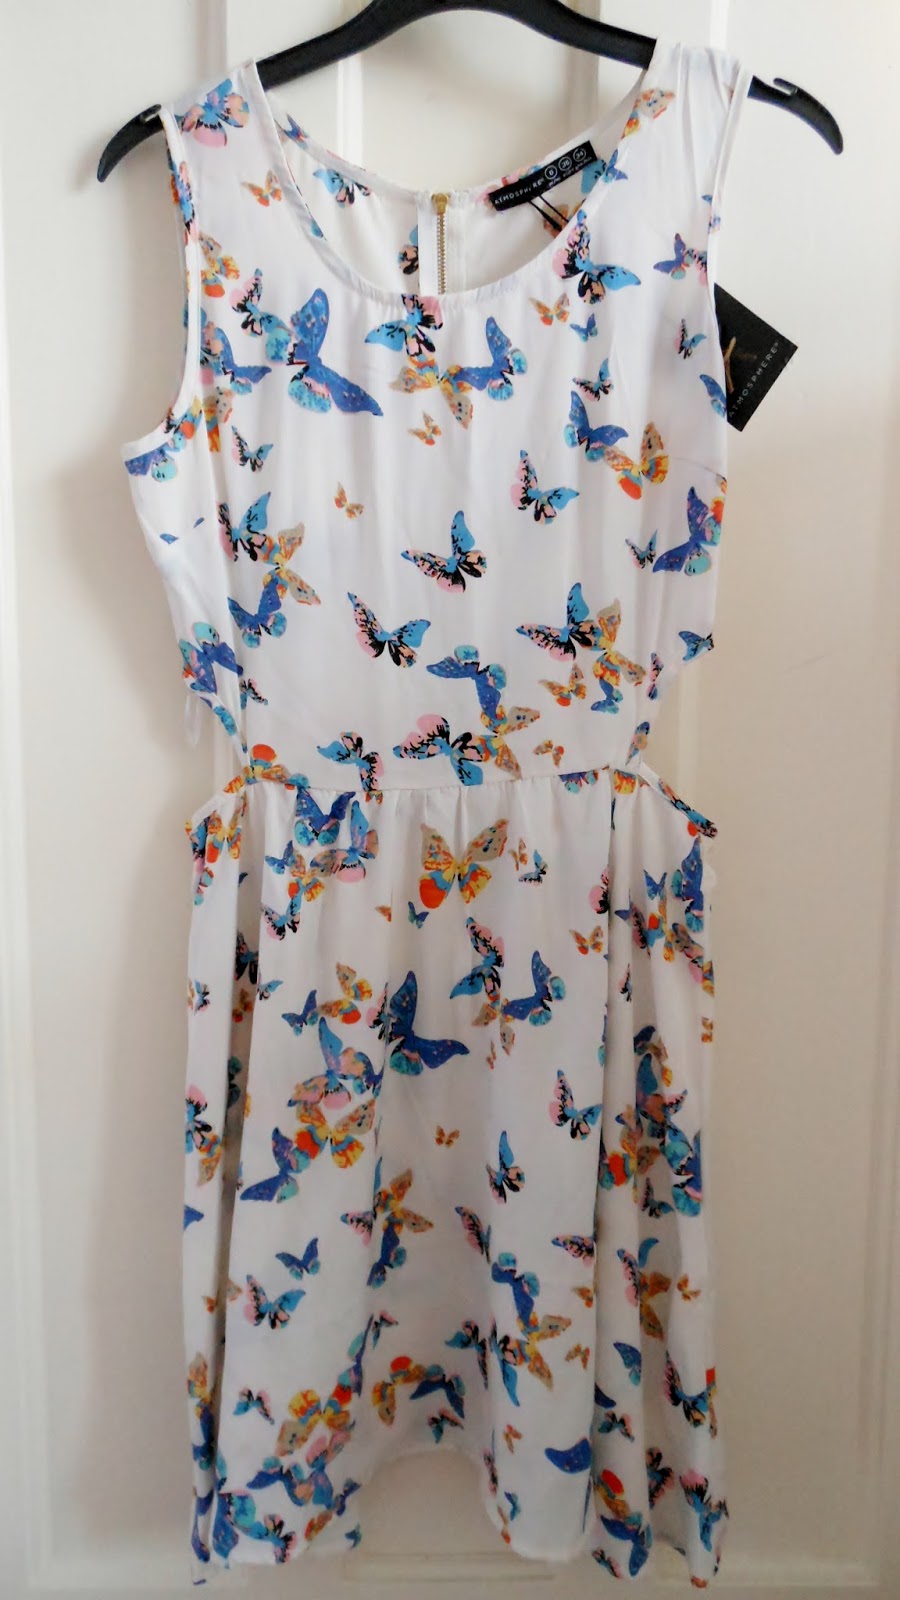
Butterfly cut-out dress: £13
 This dress has been very popular in my local Primark as there was barely any of my sizes left but luckily, I found one! I love, love, love this dress and the fact that it has cut-outs at the waist. It is such a gorgeous material so it's good quality and has a zip-up back. The material isn't very flexible so make sure you get the right size. But apart from that, this is a lovely evening dress.

Shirt Dress: £10
I  thought that this dress was super-summery and had a bit of a tropical feel to it, which I love. Primark have detected the issue of the fact that the material is quite sheer, and have provided a yellow dress lining inside which is great, and it's sewn in, so you won't lose it. The material is of good quality and the dress comes with a belt, which isn't attached so you have to look after that part of the dress. I really like the little gold-coloured buttons on the front as they suit the dress really well.

Sandals: £2.50
Moving on to shoes! Well more specifically, sandals. I have a major problem with feet, I just really do not like them, especially my own. Therefore, I'm trying to learn to like them by wearing sandals! This pair were 2.50 and they look really nice, however, they can feel a bit  tight. I have bought these for beachwear mostly. But they were a complete bargain and they come in black, white and pink? (I'm not too sure if they do anymore colours). 

Gladiator Sandals: £6
This last item was a pair of gladiator sandals. So I was in Primark, looking for another pair of sandals, and I fell head over heels in love with this pair because they look absolutely gorgeous (well done Primark). This pair was the last in my local Primark so you can tell that they've been loved by many. They are so comfortable, I've been wearing them around to get used to them and they're doing very well. The cage is a bit big but it's something that you do get used to and it's a benefit as it makes them easier to wear? That's just my opinion though so yours may be different.

So that's the Primark shopping bag emptied, photographed and reviewed! I hope you liked this post, if you did, don't forget to comment on this post as I love your feedback and go ahead and follow me on gfc and bloglovin'!

Thank you for reading!

Bye lovelies!
xoxo


Tuesday 16 July 2013

DIY Bunting

Hello lovelies! 

It has been far too long since I last posted and I apologise for that but I have been so busy and haven't had a clue about what to post...until now!

Today I thought I'd do a completely different post for you! At the moment, I'm on my summer holidays and hence, have a lot of time on my hands; so I decided to make some room decorations as my room is in desperate need of some homemade touches. 


Pre-warning: These are not the most professional bunting flags, but I made them how I wanted them! 

You will need:


Scissors, Fabric, String (whatever length you would like, Pen/Marker, Sellotape,Paintbrush (optional), Acrylic Paint (optional), Cardboard template, newspaper and water!

Method!

Step 1: Make your cardboard template!
             
You can make you cardboard template by drawing any size triangle you like and cut it out! I used a cereal box for my cardboard template.


Step 2: Draw your triangle on to the fabric!


Place your cardboard template on to your fabric and then use your marker/pen to draw around the outside of your cardboard triangle template. 


Step 3: Cut out the triangle!


 Use your scissors to cut out the triangle you have just draw on your fabric.


Step 4: Repeat! 

Repeat this step until you have enough triangles for your string (you decided how long you want your string) 


Step 5:  Cut out circles on your template. If you don't want to paint polka dots on your flags, then skip steps 5 and 6.


Firstly draw around something circular, perhaps a glue-stick lid and then, using scissors, cut out the circles!


Step 6: Paint your polka dots! 


Using an acrylic paint of your choice (fabric paint would be better) paint your polka dots onto the fabric using a paintbrush. I used acrylic because I know it dries fast and it doesn't come off easily. 

Step 7: Attach the flags to the string


If you wanted to do this properly, you would use ribbon and a sewing machine except,I don't like sewing machines hence why I did it the cheap-skate way! So, after the paint dries, turn over the flag and then attach it to the string using sellotape! I left several inches between the start of the string and the flag and then two inches between each flag. 


Voila!! 


 I hope you guys liked this post as I had a lot of fun doing DIY! If you want more of these homemade things, then please leave a comment below! If you actually make these, send me a picture!! Either by e-mail, twitter or under the tumblr tag #collarsandchocolates. I'd love to know that I'd inspired you to do this.

Thank you guys for reading! 

xoxo

Monday 1 July 2013

What I wore: Restaurant (2)

Hey Lovelies!


I know, another 'restaurant' post. What can I say? I eat out a lot... But the restaurant was so so pretty and it was such a lovely day.
But anyway, I quite liked my makeup so I thought I would share that with you today!!

This is now probably my go-to summer going out look (that was a mouthful). I absolutely love the brown eyes and then the bright red lip and I will most definitely be wearing this when I go out!

All the products that I used
So, firstly I applied my concealers which is collection's lasting perfection one and No7's calm and conceal. Then I put on my foundation, which is Rimmel London's Wake Me Up foundation as I find it makes your face glow, which is perfect for the summer. Whilst that was soaking into my skin, I filled in my brows with an Estee Lauder eyeshadow, from the palette in the left hand corner, called Wild Sable from the Pure Colour collection. I then went on to my eyes! I covered the lids of my eyes with Sugar Biscuit, from the same Estee Lauder palette I love Sugar Biscuit and I have been using it for years, it's such a nice, light shimmery colour. Next, I put 'Wild Sable' into the crease of my eye and slightly on the lid and blended the c=two colours together. After that, I added another darker brown eyeshadow from Max Factor (which I can't find the name of, sorry) just above the crease of my eye and blended that colour with the Estee Lauder eyeshadow. I then lined my eyes with the Estee Lauder Pure Colour eyeliner - Blackened Cocoa. This eyeliner is very similar in colour to MAC's eyeliner - coffee so check Estee Lauder's eyeliner out MAC lovers! 

After this I contoured my face using the sleek palette in the top right hand corner. Firstly, I used the brown shade to contour under my cheekbones and the bridge of my nose. I then went down the middle of my nose with the highlighter and on the top of my cheekbones and after that, I added the shimmery blush on to the apples of my cheeks. After, I applied my Bourjois bronzer to every part of my face that the sun would touch and set my makeup with my Rimmel Stay Matte Powder. 

I then used my most favourite red/orange lipstick in the entire world, which has been discontinued much to my disappointment  We all have those lipsticks that we don't use, well this was one of them until a week ago when I absolutely fell head over heels in love with it. It's such a gorgeous colour and has a bit of shimmer. It is the Pure Colour lipstick in Tangerine and it was a beautiful lipstick (Estee Lauder please bring this back!) I'm trying not to use too much of it so it will last me a long time, hopefully. If any of you know where I can find a lipstick similar to this one, please comment below because I need another one like this in my life.

After, I then painted my nails with the Max Factor Max Effect nail polish in Deep Coral which is the same colour as my discontinued Estee Lauder lipstick. I find that this nail varnish dries really quickly and I'm not a patient person so this is a very handy nail varnish indeed!

So Ta Da! That is my complete look! I hope you enjoyed this blog post because I enjoyed writing it and, it took me such a long time to write! 

Thank you for reading, please comment below if you have any suggestions (especially regarding the lipstick) or just any general comments about the look.

Bye my lovelies!! 

xoxo